Useful forums and websites about liquid emulsion:
http://www.ilfordphoto.com/photocommunity/forums/theforum/topic.asp?TOPIC_ID=6233
http://www.alternativephotography.com/wp/processes/liquid-emulsion/the-liquid-emulsion-process
http://www.costaricacoffeeart.com/lucenta_liquid_photo_emulsion.php
http://www.ehow.com/how_7727421_paint-liquid-emulsion-paper.html
Thursday, 31 March 2011
Tuesday, 29 March 2011
Degree show
For my degree show I I want to expose my photographs onto different materials. I had tried to do this in the first term however it was more difficult than I thought but I am now up for the challenge! One of the most favourtie things I enjoy when working in the darkroom is how experimental it is. I have begun experimenting with liquid emulsion. This is a process through which you can transfer photographs onto any material for example wood, fabric, metal, glass. There are many different stages to using the liquid emulsion. I have bought a book, 'Silver Gelatin. A User's Guide To Liquid Photographic Emulsion', to help me.
Here are the stages summarised:
1. Prepare the surface that is going to be used. It must be as clean as possible. If material with a smooth surface is going to be used e.s. glass, it will need preparation to help the emulsion stick to it. Using a subbing layer such as varnish or primer, allows bonding between the base and the subbing layer, and also between subbing and the emulsion, providing much better adhesion than would be found than coating the base directly.
2. The surface is then coated with the emulsion. The emulsion is solid so needs to be melted down before it is used. This can be done by putting the container into a large hot water bath. It melts in a couple of minutes. The liquid can then be diluted with warm water if it is needed. Porous materials need two or more coats. There are different methods to coating the materials for exmaple, using a brush, rollers, dip coating spraying etc.
3. The emulsion needs to dry before it is worked on. It can either be left to dry naturally or assist the speed of drying by using a hairdryer on low heat, or a fan heater.
4.Once dry the test strips need to be used to determine the exposure time.
5.Develop the same as photographic paper but give it slightly longer in each tray.
Monday, 28 March 2011
Degree Show Proposal Form
Short description and (working) title of the work you intend to exhibit:
I want to exhibit my photographs exposed on to glass or mirror. Either a large glass panel hung from the ceiling with an image on either side of the glass. Or a large cube with an image on each side of the glass. Or smaller glass/mirrored panels hung on the wall.
I have been experimenting with liquid emulsion. If it fails to work then I will be showing large photographs of my work.
What medium or media do you intend to use?
3D, being glass or mirrored sheets
or
Photography
What facilities or equipment (material, technology, plinths, security locks, etc) do you need?
None
Please specify the dimensions (floor/wall space etc) of your work:
Floor space for large glass panels hung from the ceiling
or
Wall space for smaller glass/mirrored panels (10x8ins)
or
Wall space for photographs (20x24ins)
What in your view are the health and safety implications?
The glass may be sharp around the edges however I will smooth them down so this should not be a problem. If the glass is hung from the ceiling, this could cause I problem if someone is to fall into it.
Sunday, 27 March 2011
Tutorial with Nicola Dale
Nicola Dale is an ex student from Interactive Arts. Since then she has gone on to achieve a Masters in Visual Culture and created pieces of art from exhibitions around the UK, either solo or collaborating with other people. The objects Nicola uses are usually neglected things e.g. books or undervalued e.d. wood chip wallpaper, manipulating it into a unique, beautiful piece of art. While creating the work she thinks carefully about the viewer, wanting them to look at the work, think about it and remember it for a long time.
Nicola Dale's blog: http://nicoladale.wordpress.com/
Notes from the tutorial:
What do I want my work to say? What story do I want to tell the viewer?
The viewer will look at my piece of work for one minute, what do I want them to take from my work and walk away with?
Ideas for my degree show were that I could take it a step further and make a cube from glass and have one image on each side of the cube. Don't be afraid to work big!
Artists that Nicola Dale recommended are:
Shimon Attie
David Lachapelle
Chuck Close and his images of Kate Moss
Saturday, 26 March 2011
Anish Kapoor
I visited an exhibition at the Manchester Art Gallery by the artist Anish Kapoor. Kapoor's sculptures are characterised by his distinctive use of materials, sense of scale an an ongoing investigation into positive and negative space. He is fascinated by opposite forces: contrasts of light and dark, form and void, inside and outside, surface and depth, abstraction and figuration, reflection and absorption.

Turning the World Inside Out
1995
One of Kapoor's first highly polished mirrored works in which we see ourselves and our surroundings reflected. These reflections are distorted, warped by the curved surface and become unreadable. I want to use mirror as a material in my work. I plan to expose photographs on to mirror using liquid emulsion. I like how the viewer becomes part of the work. The piece looks different who ever is viewing it.

Her Blood
1998
Stainless Steel and lacquer
This was my favourite piece in the exhibition. Colour and mirrored surfaces come together in three huge concave mirrors, two of these are clear mirrors and the third is stained with red. The viewer becomes part of the piece, the reflection of the viewer changes depending on where they are stood. There are lots of rings on the mirrors. When I walked up to the mirrors I felt slightly disorientated as the rings looked like they were moving. It reminded me of when you look outside a window in a fast moving car. The colours from the reflections all blur together. The piece looks different from all angles. Standing opposite the mirrors your voice was echoed from their concave shapes. Your voice is thrown back to you aswell as your reflection, engaging our senses. The mirrors were very mesmerising.

Untitled
1995
Stainless Steel
The piece reminded me of a vortex, i felt like it was pulling me into the dark void in its centre. It looks like it is never ending, a black hole. Different reflections could be seen in the mirrored surface. Similar to mirrors at the fairground, the viewers body is distorted from the curved mirror.

Void
1994
Fibreglass and pigment
A blue fibreglass form which hangs on the wall of the gallery. Looking at the piece in profile it looks as if it is never ending, it is hard to tell when it stops. It looks flat however looking at it from the side it is sphere shaped.

Adam
1988-89
Sandstone and Pigment
A blue recess is carved out of a large piece of freestanding sandstone. Kapoor had the idea of emptying out all of the pieces content and created something that is an empty form. However, he does not empty out all of the content at all, the content is their in a way that is more surprising than if he had tried to make a content.

When I Am Pregnant
1992
Fibreglass, Wood and Paint
It looks like it is not actually there, it is only made evident from the shadow in the bottom right corner. I felt as though my mind was playing tricks on me, I was confused as the work appears when you look at it from the side but then disappears when you look at it face on, distorting your mind.
Turning the World Inside Out
1995
One of Kapoor's first highly polished mirrored works in which we see ourselves and our surroundings reflected. These reflections are distorted, warped by the curved surface and become unreadable. I want to use mirror as a material in my work. I plan to expose photographs on to mirror using liquid emulsion. I like how the viewer becomes part of the work. The piece looks different who ever is viewing it.
Her Blood
1998
Stainless Steel and lacquer
This was my favourite piece in the exhibition. Colour and mirrored surfaces come together in three huge concave mirrors, two of these are clear mirrors and the third is stained with red. The viewer becomes part of the piece, the reflection of the viewer changes depending on where they are stood. There are lots of rings on the mirrors. When I walked up to the mirrors I felt slightly disorientated as the rings looked like they were moving. It reminded me of when you look outside a window in a fast moving car. The colours from the reflections all blur together. The piece looks different from all angles. Standing opposite the mirrors your voice was echoed from their concave shapes. Your voice is thrown back to you aswell as your reflection, engaging our senses. The mirrors were very mesmerising.
Untitled
1995
Stainless Steel
The piece reminded me of a vortex, i felt like it was pulling me into the dark void in its centre. It looks like it is never ending, a black hole. Different reflections could be seen in the mirrored surface. Similar to mirrors at the fairground, the viewers body is distorted from the curved mirror.
Void
1994
Fibreglass and pigment
A blue fibreglass form which hangs on the wall of the gallery. Looking at the piece in profile it looks as if it is never ending, it is hard to tell when it stops. It looks flat however looking at it from the side it is sphere shaped.
Adam
1988-89
Sandstone and Pigment
A blue recess is carved out of a large piece of freestanding sandstone. Kapoor had the idea of emptying out all of the pieces content and created something that is an empty form. However, he does not empty out all of the content at all, the content is their in a way that is more surprising than if he had tried to make a content.
When I Am Pregnant
1992
Fibreglass, Wood and Paint
It looks like it is not actually there, it is only made evident from the shadow in the bottom right corner. I felt as though my mind was playing tricks on me, I was confused as the work appears when you look at it from the side but then disappears when you look at it face on, distorting your mind.
Tuesday, 22 March 2011
Important Dates
12th-13th May: Clear Studio
16th May: Meeting at the Holden Gallery to arrange exhibition spaces etc
Friday 27th May: Degree show goes up
Friday 3rd June: Show to be completed by 4.30 pm
6th June-9th June: Assessments
13th-14th June: External Examiner visits
14th-17th June: Degree show refinements
17th June: Degree show private viewing
18th-22nd June: Degree show open
23rd June: Degree show comes down
23rd June: Results
22nd July: Graduation
Sunday, 20 March 2011
Museum of London
London Street Photography
During my visit to London I went to an exhibition on London Street Photography at the Museum of London. It was very interesting and I learnt a lot about the history of street photography and how it has developed and changed over time.
The exhibition began in 1860 and showed photographs of everyday life in the streets. However, before the late 1880s photographs could rarely capture movement due to long exposure times. Due to this, photography was then seen as a poor medium for depicting the busy nature of London streets.
Around 1890 technical developments in photography came together to produce the first hand-held multi-shot cameras with exposure times short enough to freeze moving objects. Photography came into its own as a means of capturing the scale, vitality and movement of life in the world's largest city. As the use of photographs in newspapers and magazines grew, a new profession came about: the press photographer. Amateur photographers also took to the streets using new roll-film cameras such as Kodak.
Paul Martin began using a camera disguised as a parcel to photograph people unawares, catching people off-guard or in unexpected places:


By 1930 camera technology had matured to allow photographs to be taken almost anywhere. Photographers began to document London's deep social contrasts alongside the capital's ever-changing street life. They provided visual evidence for inequality and social conditions. Wolf Suschitzky came to London from Vienna in 1935 and began a personal project to photograph the life of Charing Cross Road, day and night.

Cambridge Circus, London, 1936

Foyles, Charing Cross Road, London, 1936

Wyndham's Theatre, Charing Cross Road, London, 1934

Charing Cross Road, London, 1937

Charing Cross Road, London, 1937
Social and cultural changes after the Second World War provided a new focus for street photography. Many photographers were keen to capture the 'old' working class areas of London before it disappeared and was redeveloped.
Roger Mayne photographed areas in North Kensington. He documented children playing, often in the bomb sites left by the Blitz.

Roger Mayne, 1956
Three boys playing on a home-made go kart, Addison Place
The final section of the exhibition focused on a more up to date approach of street photography and showed the shift towards a more conceptual look. Digital technology has opened up new ways of making images, and the web of sharing them. A new generation of photographers found inspiration in urban streets. There is an international group of street photographers, 'in-Public', which promote the genre.
Paul Baldesare photographs London's busy shopping streets, looking for remarkable gestures and expressions by individuals going about their everyday lives.
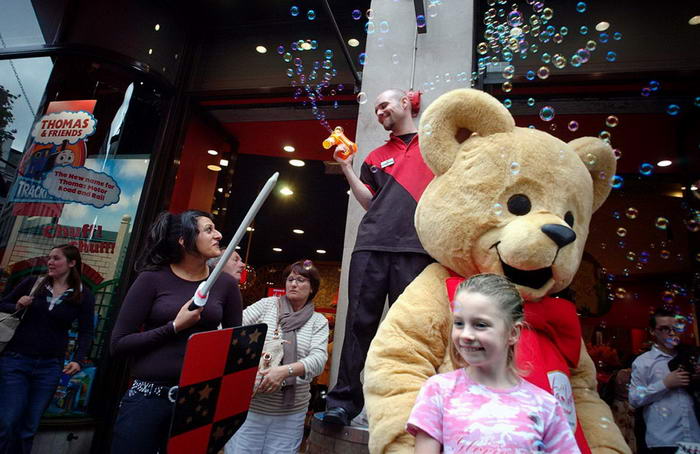
Hamley girl, the bear and the bubbles
Paul Baldesare
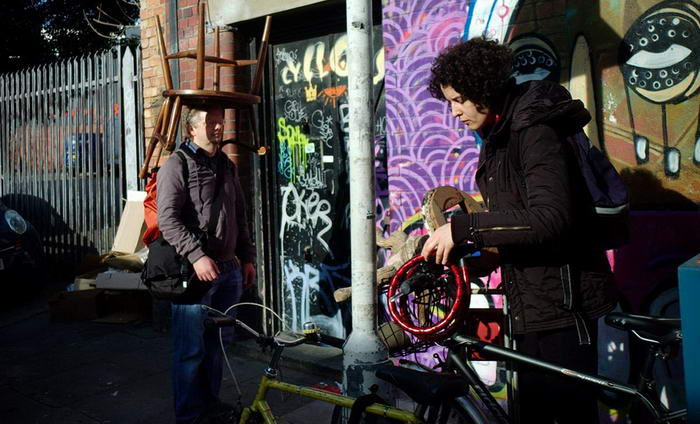
Brick Lane Market
Paul Baldesare
During my visit to London I went to an exhibition on London Street Photography at the Museum of London. It was very interesting and I learnt a lot about the history of street photography and how it has developed and changed over time.
The exhibition began in 1860 and showed photographs of everyday life in the streets. However, before the late 1880s photographs could rarely capture movement due to long exposure times. Due to this, photography was then seen as a poor medium for depicting the busy nature of London streets.
Around 1890 technical developments in photography came together to produce the first hand-held multi-shot cameras with exposure times short enough to freeze moving objects. Photography came into its own as a means of capturing the scale, vitality and movement of life in the world's largest city. As the use of photographs in newspapers and magazines grew, a new profession came about: the press photographer. Amateur photographers also took to the streets using new roll-film cameras such as Kodak.
Paul Martin began using a camera disguised as a parcel to photograph people unawares, catching people off-guard or in unexpected places:
By 1930 camera technology had matured to allow photographs to be taken almost anywhere. Photographers began to document London's deep social contrasts alongside the capital's ever-changing street life. They provided visual evidence for inequality and social conditions. Wolf Suschitzky came to London from Vienna in 1935 and began a personal project to photograph the life of Charing Cross Road, day and night.
Cambridge Circus, London, 1936
Foyles, Charing Cross Road, London, 1936
Wyndham's Theatre, Charing Cross Road, London, 1934
Charing Cross Road, London, 1937
Charing Cross Road, London, 1937
Social and cultural changes after the Second World War provided a new focus for street photography. Many photographers were keen to capture the 'old' working class areas of London before it disappeared and was redeveloped.
Roger Mayne photographed areas in North Kensington. He documented children playing, often in the bomb sites left by the Blitz.
Roger Mayne, 1956
Three boys playing on a home-made go kart, Addison Place
The final section of the exhibition focused on a more up to date approach of street photography and showed the shift towards a more conceptual look. Digital technology has opened up new ways of making images, and the web of sharing them. A new generation of photographers found inspiration in urban streets. There is an international group of street photographers, 'in-Public', which promote the genre.
Paul Baldesare photographs London's busy shopping streets, looking for remarkable gestures and expressions by individuals going about their everyday lives.
Hamley girl, the bear and the bubbles
Paul Baldesare
Brick Lane Market
Paul Baldesare
Saturday, 19 March 2011
The National Portrait Gallery
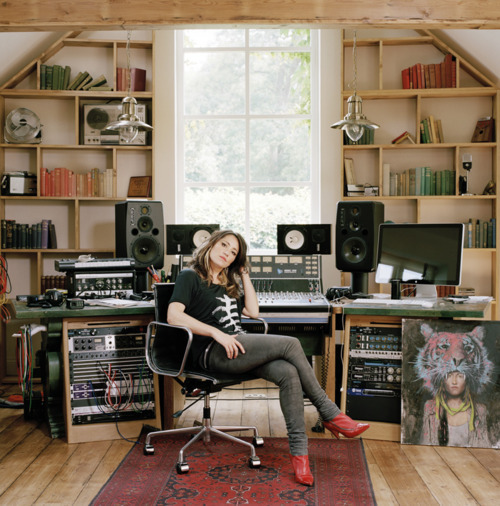
Whilst in London I visited the National Portrait Gallery. I like portrait photographs, one of the exhibitions I enjoyed was Eighteen by Twelve: Recent Photo Aquisitions. This was a visual reflection of British life and culture. The exhibition displayed photographs of people involved with popular science, comedy and art, to contemporary pop music. There is a range of photographs in the display, from the master of portrait photography, David Bailey, to younger photographers such as Kate Peters. Here are a few photographs from the exhibition and others I liked in the gallery.


Whitechapel Gallery London - John Stezaker Exhibition
On my trip to London I was able to see an exhibition by an artist I have been researching, John Stezaker. I think his work is fascinating and very unique. He has taken old images and given them new meanings, creating illusions that force the viewer to reassess the image.When looking at his work, I looked at each composition in a new way, paying extra attention in case my eyes were deceived. By inserting new meanings into old photographs, Stezaker manages to re establish the power of the image.
Here is a link to an interview with the artist:
http://www.tate.org.uk/britain/exhibitions/triennial/video.shtm#stezaker


Tabula Rasa XV 2009
I think it is very effective when Stezaker removes sections of the image he is working with. In his collages of film stills he cuts sections away, interfering with the image and interrupting the narrative. While viewing the images I was filling the gaps with my imagination. I asked myself questions such as who are they talking to? How does the photograph look when it is complete?

Mask 1982
In the 'Mask' series Stezaker has fused the profiles of glamorous sitters with caves, hamlets or waterfalls resulting in an image of eerie beauty. He has placed colour postcards over the monochrome portraits. In the image above there is a gap in the postcard where there is a gap in the image of the two faces. The faces are coming together in the image, like the two cliffs in the Gorges de L'Aar coming together. The images are perfectly aligned, at a quick glance I did not even release it was a postcard.

Mask 1982
In the image above, the two bridges remind me of her two eyes, the arches of the stone bridges look like a pair of gawping eyes. Stezaker manages to sublimely make the image work.


The Bridge (from the castle series) 2008
These images from The Bridge series is similar to my photographs where Stezaker has used two images and put them together.


Marriage series 2010
These images look weirdly unsettling however they seem to work together. The faces are aligned together perfectly. He joins the faces together focusing on the facial features such as the eyes or nose. The images are confusing and play with the mind. I think they are similar to my work, working with two images and putting them together.

From the love series 2006
It is often through the eye that Stezaker makes his incision, either vertically or horizontally. In the 'Love' series a narrow strip of the same image is inserted along the eye line, so that the subject stares out at us with expanded, blurry, alien eyes. The subject is staring out at the viewer, giving a spooky eerie feel. The eyes remind me of refraction in water.
Blind 2006
In the series 'Blind' the eyeballs have been razored out along a straight line and the edges of the photographs brought together again.
Here is a link to an interview with the artist:
http://www.tate.org.uk/britain/exhibitions/triennial/video.shtm#stezaker
Tabula Rasa XV 2009
I think it is very effective when Stezaker removes sections of the image he is working with. In his collages of film stills he cuts sections away, interfering with the image and interrupting the narrative. While viewing the images I was filling the gaps with my imagination. I asked myself questions such as who are they talking to? How does the photograph look when it is complete?
Mask 1982
In the 'Mask' series Stezaker has fused the profiles of glamorous sitters with caves, hamlets or waterfalls resulting in an image of eerie beauty. He has placed colour postcards over the monochrome portraits. In the image above there is a gap in the postcard where there is a gap in the image of the two faces. The faces are coming together in the image, like the two cliffs in the Gorges de L'Aar coming together. The images are perfectly aligned, at a quick glance I did not even release it was a postcard.
Mask 1982
In the image above, the two bridges remind me of her two eyes, the arches of the stone bridges look like a pair of gawping eyes. Stezaker manages to sublimely make the image work.
The Bridge (from the castle series) 2008
These images from The Bridge series is similar to my photographs where Stezaker has used two images and put them together.
Marriage series 2010
These images look weirdly unsettling however they seem to work together. The faces are aligned together perfectly. He joins the faces together focusing on the facial features such as the eyes or nose. The images are confusing and play with the mind. I think they are similar to my work, working with two images and putting them together.
From the love series 2006
It is often through the eye that Stezaker makes his incision, either vertically or horizontally. In the 'Love' series a narrow strip of the same image is inserted along the eye line, so that the subject stares out at us with expanded, blurry, alien eyes. The subject is staring out at the viewer, giving a spooky eerie feel. The eyes remind me of refraction in water.
Blind 2006
In the series 'Blind' the eyeballs have been razored out along a straight line and the edges of the photographs brought together again.
Friday, 18 March 2011
V and A Museum
The History of Camera Less Photography
During my London trip I visited an exhibition on the history of camera less photography at the Victoria and Albert museum. The word 'photography' comes from the Greek for 'light' and 'writing'. At its most basic, a photograph is an image produced by the action of light and chemicals on a light sensitive surface. However, the exhibition was about how photographs can actually be made without the use of a camera. Some of the earliest photographs were created by placing objects such as leaves or lace directly onto sensitive paper, which was then exposed to light. The resulting image is known as a photogram.

Calvert Richard Jones
Lime Leaf
About 1845
This direct photographic impression is an example of the earliest kind of photography practiced in Britain. The leaf was laid onto photo-sensitised paper, covered by a sheet of glass and exposed to sunlight. The resulting negative image was transferred to another piece of sensitive paper in the same way, to produce the positive image that is shown here. This process is known as 'photogenic' drawing and was discovered by William Henry Fox Talbot in 1835.

Jean-Baptiste-Camille Corot
The Little Sister
1854
This is a photograph made using the 'cliche verre' technique, a photograph made from a hand-drawn negative. The design is scratched onto a piece of smoked glass, which is placed onto a sheet of sensitised paper and exposed to light. The blackened area of the glass acts as a stencil, protecting the sheet below from the light, therefore creating black lines on the paper.

Anna Atkins
Festuca Ovina
About 1854
This photograph was made using a process known as 'cyanotype'. To make a cyanotype a sheet of paper is brushed with iron salt solutions and dried in the dark. The object to be reproduced was then placed on the sheet in direct sunlight. After a few minutes of exposure the paper is washed in water, where oxidation produces a white image on a brilliant blue, or cyan, background.

Curtis Moffat
Abstract Composition
About 1925
In the 1920s the photogram process was rediscovered by the avant-garde artists. They were attracted by the element of chance, spontaneity and experiment in creating an image. Moffat was among the first to use the technique, which he came across when working in Many ray's studio in Paris. He made abstract compositions, developing them in layers to create a tonal range.


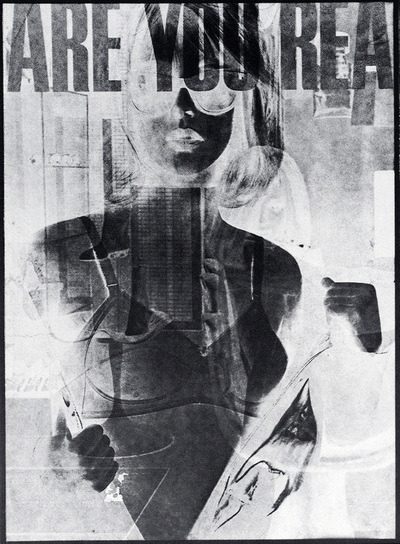
Robert Heinecken
Are you Rea
1964-68
Believing that too many photographic images already existed, Heinecken turned to found images such as newspapers and product packaging. He used the material in a variety of transformations for example, lithography, etching and photograms. In 'Are you Rea' he has layered his material to explore notions of consumer culture and self-image. These were the photographs I liked the most from the exhibition as they reminded me of my double exposed images and the photographs of the magazine pages. This is because Heinecken has layered different images together to create a new image.
Barbara and Zafer Baran
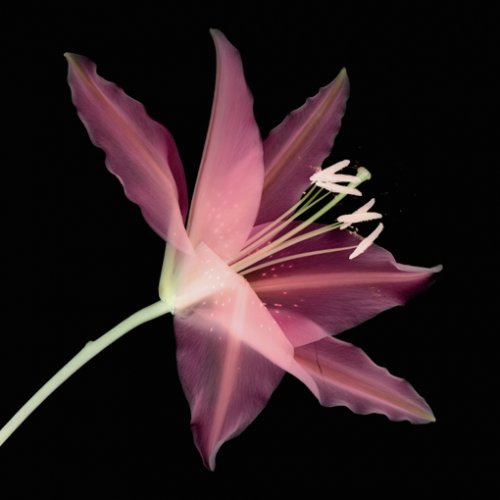
The Flower Cabinet
2003
The images in the 'Flower Cabinet' series were made by placing a flower directly onto a scanner. Light passing through the translucent petals, revealing its hidden parts. The scanner works similar to an X-ray machine, leaving this luminous image.
During my London trip I visited an exhibition on the history of camera less photography at the Victoria and Albert museum. The word 'photography' comes from the Greek for 'light' and 'writing'. At its most basic, a photograph is an image produced by the action of light and chemicals on a light sensitive surface. However, the exhibition was about how photographs can actually be made without the use of a camera. Some of the earliest photographs were created by placing objects such as leaves or lace directly onto sensitive paper, which was then exposed to light. The resulting image is known as a photogram.
Calvert Richard Jones
Lime Leaf
About 1845
This direct photographic impression is an example of the earliest kind of photography practiced in Britain. The leaf was laid onto photo-sensitised paper, covered by a sheet of glass and exposed to sunlight. The resulting negative image was transferred to another piece of sensitive paper in the same way, to produce the positive image that is shown here. This process is known as 'photogenic' drawing and was discovered by William Henry Fox Talbot in 1835.
Jean-Baptiste-Camille Corot
The Little Sister
1854
This is a photograph made using the 'cliche verre' technique, a photograph made from a hand-drawn negative. The design is scratched onto a piece of smoked glass, which is placed onto a sheet of sensitised paper and exposed to light. The blackened area of the glass acts as a stencil, protecting the sheet below from the light, therefore creating black lines on the paper.
Anna Atkins
Festuca Ovina
About 1854
This photograph was made using a process known as 'cyanotype'. To make a cyanotype a sheet of paper is brushed with iron salt solutions and dried in the dark. The object to be reproduced was then placed on the sheet in direct sunlight. After a few minutes of exposure the paper is washed in water, where oxidation produces a white image on a brilliant blue, or cyan, background.
Curtis Moffat
Abstract Composition
About 1925
In the 1920s the photogram process was rediscovered by the avant-garde artists. They were attracted by the element of chance, spontaneity and experiment in creating an image. Moffat was among the first to use the technique, which he came across when working in Many ray's studio in Paris. He made abstract compositions, developing them in layers to create a tonal range.
Robert Heinecken
Are you Rea
1964-68
Believing that too many photographic images already existed, Heinecken turned to found images such as newspapers and product packaging. He used the material in a variety of transformations for example, lithography, etching and photograms. In 'Are you Rea' he has layered his material to explore notions of consumer culture and self-image. These were the photographs I liked the most from the exhibition as they reminded me of my double exposed images and the photographs of the magazine pages. This is because Heinecken has layered different images together to create a new image.
Barbara and Zafer Baran
The Flower Cabinet
2003
The images in the 'Flower Cabinet' series were made by placing a flower directly onto a scanner. Light passing through the translucent petals, revealing its hidden parts. The scanner works similar to an X-ray machine, leaving this luminous image.
Saturday, 12 March 2011
Darkroom photography equipment

This is a timer where the exposure time can be changed using the dials. There are three dails, one going up in 10 seconds, one going up in seconds and the other in one tenth of a second. These are changed according to how long the image is needed to be exposed on to the photographic paper.

This is where we know the different stages that the roll of film is in during the process in the C41. When it is lit up, it indicates which stage the film is in. The film is first immersed in developer, then in a stop bath to neutralise the developer, and then ending in a photographic fixer, making it permanent. The roll of film is then washed and dried in the C41.

This is where we collect our films once they have been through the C41 machines.

An enlarger is used to project the image of a negative onto the base. A sheet of photographic paper is exposed to the enlarged image from the negative. Colour print paper must be kept in complete darkness until the prints are properly fixed. The colour filtration can be altered, increasing or decreasing the images contrast (the difference between dark tones and light tones).
Thursday, 10 March 2011
Photo Collage
Here I have collaged together all my test strips. I thought about making a large collage of them all but I have decided to keep them displayed in a sketchbook. Although they do look effective all together with the ranging display of different colours and images, I feel it only looks aesthetically pleasing and other than that it does not really do anything for me.


Subscribe to:
Posts (Atom)